Installing tile flooring can transform a space, adding durability, aesthetic appeal, and value to your home. However, to achieve a flawless and long-lasting result, it’s essential to have the right supplies and tools.
The process involves more than just choosing the perfect tile; you need to ensure you have all the necessary materials to prepare the surface, adhere the tiles, and finish the installation professionally.
Tile Spacers
Tile spacers ensure consistent gaps between tiles, allowing for even grout lines. They come in various sizes, typically ranging from 1/16 inch to 3/8 inch. Choose the spacer size based on the look you want and the size of your tiles.
Proper spacing is crucial for both aesthetics and structural integrity. Using spacers helps maintain alignment and symmetry throughout the flooring installation supplies.
Underlayment
Underlayment is crucial for a stable tile installation. It provides a smooth surface for the tiles and helps prevent cracks.
Common underlayment options include cement board, plywood, and uncoupling membranes.
For areas prone to moisture, such as bathrooms, a waterproof underlayment is recommended. Proper underlayment ensures a firm foundation and prevents tiles from shifting or breaking.
Mortar
Mortar, or thin-set, is the adhesive used to bond tiles to the underlayment. Choose a high-quality thin-set appropriate for your tile type and substrate. For large format tiles, consider using a medium-bed mortar to prevent lippage.
Mortar comes in powdered form and needs to be mixed with water or a latex additive. Using the right mortar ensures strong adhesion and longevity of the tile installation.
Trowels
Trowels are used to spread the mortar evenly. They come in various shapes and sizes, but the most common are notched trowels. The size of the notches depends on the size of the tiles you are installing; larger tiles require larger notches.
A margin trowel is also handy for mixing mortar and applying it in tight spaces. Choosing the right trowel ensures even mortar distribution and a smooth tile surface.
Tile Cutter or Wet Saw
Cutting tiles accurately is essential for a professional finish. Manual tile cutters are suitable for straight cuts on smaller tiles, while a wet saw is better for larger tiles, intricate cuts, and tougher materials like porcelain and stone.
A pair of tile nippers is also useful for small, irregular cuts. The right cutting tools ensure precise edges and a seamless fit.
Grout
Grout fills the spaces between tiles and provides a finished look. It comes in two main types: sanded and unsanded. Sanded grout is used for joints wider than 1/8 inch, while unsanded grout is best for narrower joints.
Grout also comes in various colors, so choose one that complements your tile and overall design. High-quality grout ensures durability and enhances the appearance of the tiles.
Grout Float
A grout float is used to spread grout into the joints between tiles. It has a flat, rubber surface that allows you to press the grout into the gaps without scratching the tiles.
After applying the grout, use the float to scrape off the excess. A good grout float makes the grouting process smoother and more efficient, ensuring even application and a clean finish.
Grout Sealer
Sealing your grout helps prevent stains and prolongs its life. Apply the sealer after the grout has cured, typically 48-72 hours after installation.
There are various types of sealers, including penetrating sealers for porous grout and topical sealers that form a protective layer on the surface. Proper sealing keeps grout looking fresh and prevents moisture damage.
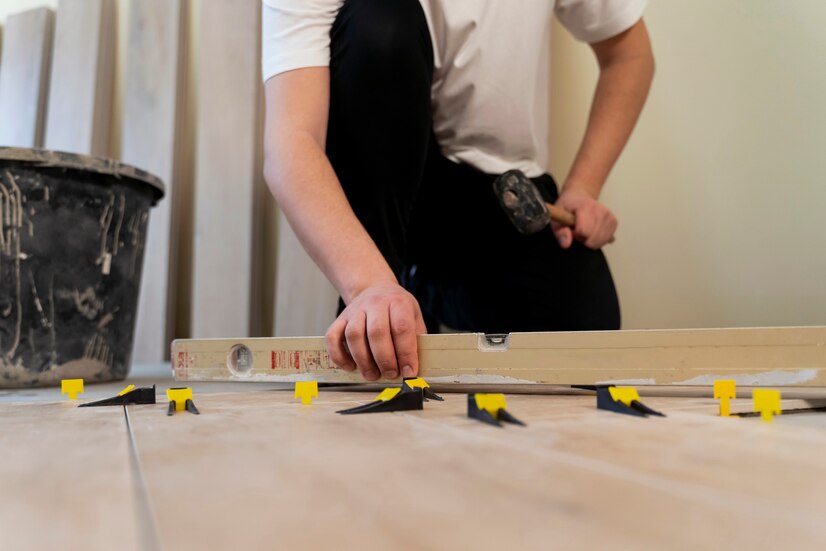
Leveling System
A tile leveling system can help ensure your tiles are perfectly flat and even, preventing lippage.
These systems typically consist of clips and wedges that hold the tiles at the same height while the mortar sets.
Using a leveling system can be particularly helpful with large-format tiles. This tool simplifies the installation process and ensures a flawless, professional look.
Bucket and Sponge
A large bucket is essential for mixing mortar and grout. A high-quality sponge is crucial for cleaning excess grout from the tiles during the grouting process.
Ensure the sponge is damp but not soaking wet to avoid washing out the grout. Keeping the tiles clean during installation ensures a neat and professional finish.
Measuring and Marking Tools
Accurate measurements are critical in tile installation. Use a tape measure, a chalk line, and a carpenter’s square to measure and mark your layout.
A laser level can also be incredibly useful for ensuring your tiles are aligned correctly. Precision in measuring and marking ensures a symmetrical and professional installation.
Protective Gear
Safety should always be a priority. Wear knee pads to protect your knees, gloves to protect your hands from sharp edges and chemicals, and safety glasses to shield your eyes from dust and debris.
Using protective gear ensures a safer working environment and helps prevent injuries during the installation process.
Conclusion
Proper preparation and the right supplies are key to a successful tile flooring installation. By ensuring you have all the necessary tools and materials, you can achieve a professional finish that enhances the beauty and functionality of your space.
Whether you’re a DIY enthusiast or a seasoned professional, this guide will help you navigate the complexities of tile installation with confidence.
A well-prepared and equipped project leads to durable and visually appealing results, providing satisfaction and value for years to come.