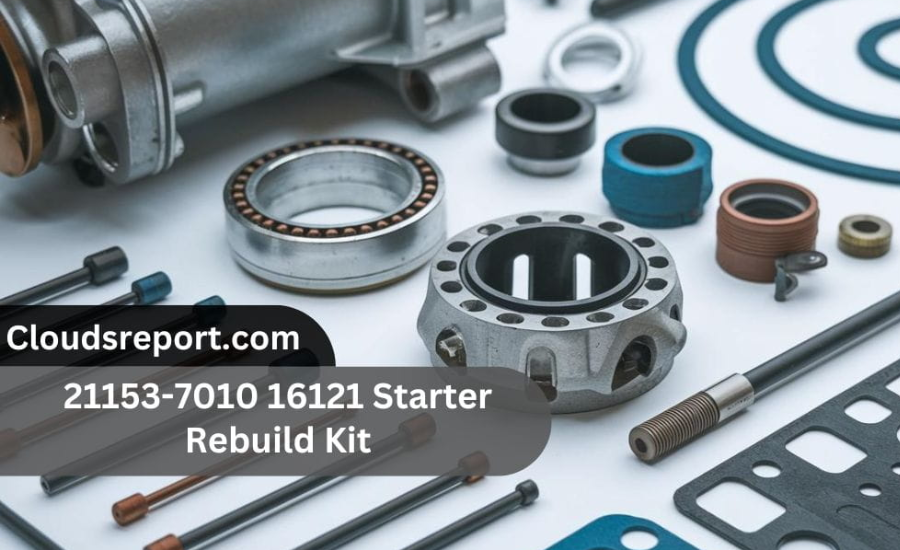
The 19 HP Kawasaki Engine 21153-7010 16121 starter rebuild kit is a key component for anyone looking to maintain or repair their engine. This kit enables you to restore the starter motor, ensuring smooth and reliable engine performance. In this guide, we’ll explore the kit’s components, benefits, and a comprehensive step-by-step process for rebuilding your engine’s starter. By the end, you’ll be fully equipped to keep your Kawasaki engine running efficiently.
What is a Starter Rebuild Kit?

A starter rebuild kit is a comprehensive collection of components designed to restore a malfunctioning or worn-out starter motor to its original functionality. When a starter motor begins to show signs of wear, such as slow cranking or inconsistent operation, it can lead to difficulty starting your engine. Rather than replacing the entire starter, a rebuild kit offers a cost-effective alternative by providing all the essential parts needed for repair.
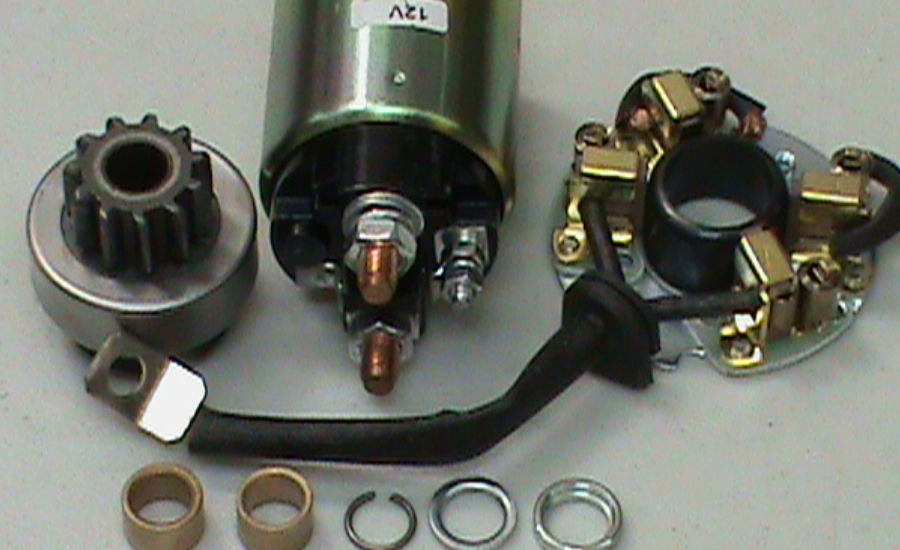
In the case of the 19 HP Kawasaki engine 21163-7010 16121 starter rebuild kit,21153-7010 16121 starter rebuild kit this specialized kit is tailored to the specifications of Kawasaki’s 19-horsepower engines. It includes critical parts such as brushes, bushings, seals, bearings, and various hardware components, all of which contribute to the reliable operation of the starter motor. The brushes transfer electricity to the motor’s moving parts, the bushings and bearings reduce friction and wear, while seals protect the motor from external debris like dirt and moisture.
Using a starter rebuild kit not only extends the lifespan of your starter motor but also enhances its reliability. The process of rebuilding is fairly straightforward, making it accessible to those with basic mechanical skills. By opting for a rebuild kit, such as the one for the 19 HP Kawasaki engine, you can avoid the significant expense of purchasing a new starter while ensuring that your engine continues to start smoothly and reliably. This approach is both environmentally friendly, as it reduces waste, and budget-conscious, offering long-term savings through regular maintenance.
Key Components of the Starter Rebuild Kit
The 19 HP 21153-7010 16121 starter rebuild kit typically includes:
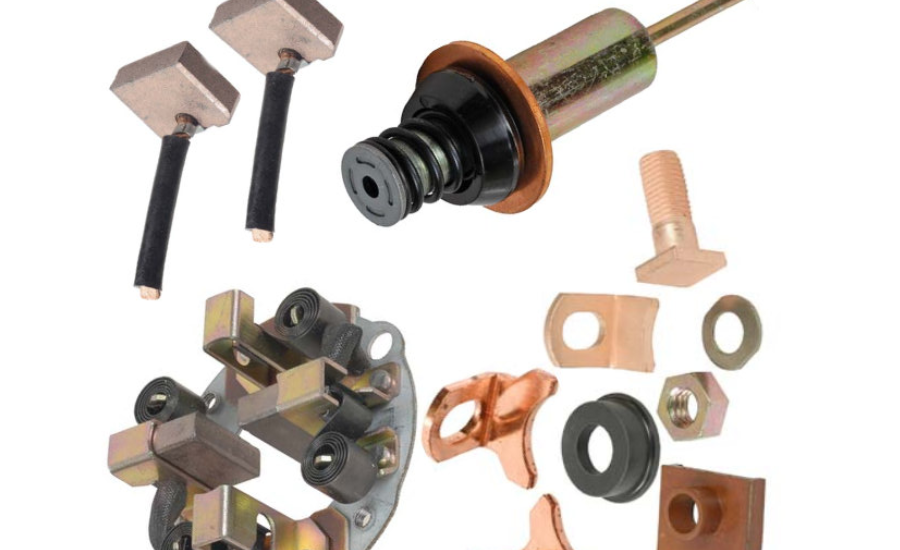
- Brushes: Conduct electricity to the armature, essential for the starter motor’s function.
- Bushings and Bearings: These reduce friction and support moving parts within the motor.
- Seals: Protect internal parts by preventing moisture and debris from entering the motor.
- Springs and Retainers: Maintain the correct positioning and tension of the brushes.
- Miscellaneous Hardware: Screws, washers, and connectors needed for assembly.
Why Use a Starter Rebuild Kit?
Rebuilding your engine’s starter with a kit offers several advantages:
- Cost-Effective: Rebuilding is often much cheaper than buying a new starter motor.
- Longevity: Replacing worn components extends the life of your starter motor.
- Improved Performance: A properly rebuilt starter leads to more consistent engine starts.
- DIY Convenience: Many kits are designed for easy installation, enabling you to handle repairs on your own.
Step-by-Step Guide to Rebuilding Your 19 HP Kawasaki Engine Starter
Tools & Materials You’ll Need:
Before starting, gather the following:
- 21153-7010 16121 starter rebuild kit
- Screwdrivers (both flathead and Phillips)
- Socket set and wrenches
- Cleaning supplies (brushes, solvent, and rags)
- Lubricant (oil or grease)
- Safety gear (gloves and safety glasses)
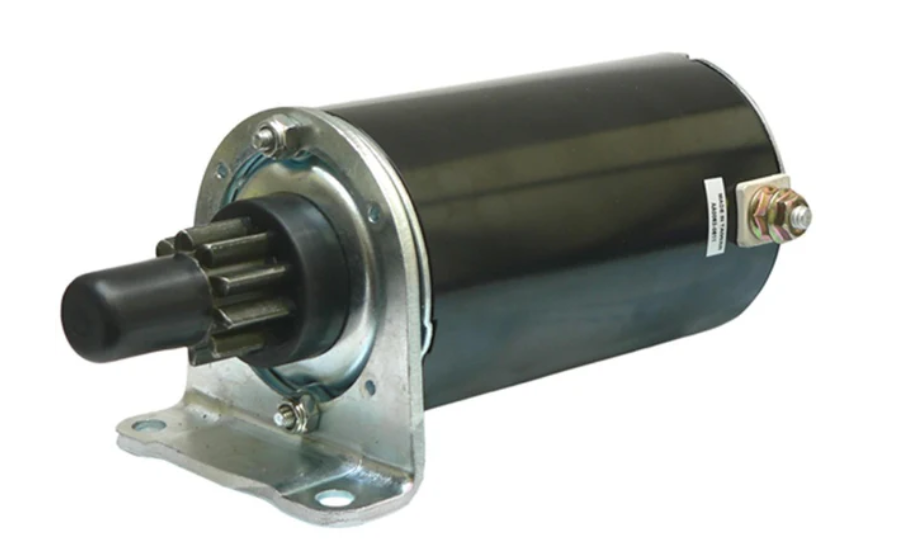
Remove the Starter Motor
- Disconnect the Battery: Always disconnect the battery to prevent electrical hazards.
- Locate the Starter Motor: Identify the starter motor on your Kawasaki engine.
- Unfasten Mounting Bolts: Use a socket set to remove the bolts securing the starter.
- Disconnect Electrical Cables: Carefully disconnect the wires attached to the motor.
- Remove the Motor: Gently pull the starter motor out of the engine compartment.
Disassemble the Starter Motor
- Clean the Exterior: Remove dirt and debris from the starter’s surface using a brush and solvent.
- Remove the End Cap: Unscrew and carefully detach the end cap of the motor.
- Extract the Armature: Take out the armature from the starter housing.
- Remove Old Brushes and Springs: Safely remove the worn brushes and springs.
Inspect & Clean Components
- Check the Armature: Examine the armature for wear or damage and clean it using a soft brush and solvent.
- Inspect Bearings and Bushings: Replace any worn-out or damaged bushings and bearings.
- Clean the Motor Housing: Ensure the inside of the motor is free from dirt and residue.
1. Install New Bearings and Bushings
- Step 1: Inspect the Housing
Before placing the new bearings and bushings, inspect the motor housing for any debris or wear. Clean the surfaces where the new components will sit to ensure a proper fit. This will help prevent future wear and reduce friction during operation. - Step 2: Fit the New Bushings
Take the new bushings provided in your starter rebuild kit and gently insert them into their designated slots in the starter motor housing. Use a soft mallet or tool to press them in place evenly. Make sure the bushings are securely seated without any gaps, as this ensures smooth rotation of internal parts. - Step 3: Insert the Bearings
Bearings play a key role in reducing friction and supporting the moving parts within the starter. Carefully press the new bearings into their corresponding slots using a bearing press tool or a socket that matches their size. Make sure they are aligned properly to avoid uneven wear during operation. Well-placed bearings help the starter motor run quietly and efficiently. - Tip: Be sure not to damage the new bearings or bushings during installation, as even a small deformity can affect the performance of the starter motor.
2. Insert Fresh Brushes and Springs
- Step 1: Remove Old Components
If you haven’t already, remove the old brushes and springs from their holders. These parts often wear down over time and can cause weak electrical connections, leading to slower cranking or no engine start. - Step 2: Install the New Brushes
Take the new brushes from your rebuild kit and position them in the brush holders inside the motor housing. Brushes are crucial for conducting electricity to the moving parts of the starter motor, so ensure they sit snugly and make full contact with the armature. If the brushes are too loose, they won’t transfer enough current, and if they’re too tight, they may wear out quickly. - Step 3: Attach New Springs
The springs keep the brushes in contact with the commutator on the armature. Insert the new springs into place, ensuring that they maintain enough tension to push the brushes against the armature without being too tight. Proper spring tension is essential for the starter to function correctly.
3. Reassemble the Armature
- Step 1: Inspect the Armature
Before reassembling the armature, inspect it for any wear or damage. Clean the commutator (the part that interacts with the brushes) with fine sandpaper or a soft brush to remove any carbon buildup. A clean commutator ensures efficient electricity transfer. - Step 2: Insert the Armature
Carefully slide the armature back into the motor housing, making sure it fits smoothly with the new bearings and bushings. The armature should rotate freely within the housing without any resistance or grinding. Misalignment could cause poor performance or damage to the starter. - Step 3: Check for Alignment
Ensure that the armature is perfectly aligned with the brushes and springs. The brushes should make even contact with the commutator as the armature rotates. Proper alignment is key to ensuring efficient starter motor function.
4. Reattach the End Cap
- Step 1: Clean the End Cap
Before reattaching the end cap, inspect it for dirt or debris. Clean it thoroughly to ensure a tight seal when reassembled. Any debris could interfere with the operation of the starter or cause premature wear. - Step 2: Position the End Cap
Once the armature and brushes are properly positioned, carefully align the end cap with the motor housing. The end cap helps secure the internal components and protect the motor from external elements like moisture and debris. - Step 3: Tighten the Screws
Fasten the screws or bolts that hold the end cap in place, ensuring they are tightened evenly. Be careful not to overtighten, as this could damage the cap or warp the motor housing. A secure end cap keeps the motor components in alignment and shields them from environmental wear.
Final Tip: Once you have installed the new components and reassembled the starter motor, it’s important to check everything thoroughly. Rotate the armature by hand to ensure it moves freely, and check that the brushes make proper contact with the commutator. If everything feels right, you’re ready to reinstall the starter motor in your engine and test it for reliable operation.
By carefully following these steps, you ensure that your 19 HP Kawasaki engine’s starter motor is rebuilt to perform like new, providing efficient and smooth engine starts.
Reinstall the Starter Motor
- Reconnect the Electrical Connections: Attach the wires to the starter motor.
- Secure the Starter: Tighten the mounting bolts to ensure the starter is properly fastened.
- Reconnect the Battery: Restore power to the engine by reconnecting the battery.
Test the Starter Motor
- Turn the Ignition: Test the starter to ensure the engine starts smoothly.
- Listen for Issues: Ensure the starter operates quietly without any unusual sounds.
Troubleshooting and Maintenance
Common Problems with Starter Motors:
- Slow Cranking: This may indicate a battery or electrical issue.
- Grinding Noise: Could be caused by worn gears or misalignment.
- Failure to Start: Check electrical connections and the solenoid if the starter doesn’t engage.
Keep the Starter Clean: Regularly clean the exterior of your starter motor to prevent the buildup of dirt, dust, and debris. Over time, these contaminants can enter the motor and affect its performance. Use a soft brush or cloth to wipe the exterior and ensure that no harmful particles accumulate around critical components.
Inspect Electrical Connections: Periodically check the electrical connections of your starter motor. Loose or corroded connections can lead to poor performance or even prevent the engine from starting. Ensure that all terminals, wires, and connectors are securely fastened and free of corrosion, moisture, or damage.
Lubricate Moving Parts: The moving parts of the starter motor, such as bushings and bearings, require proper lubrication to reduce friction and wear. Apply a suitable lubricant as recommended for your engine to ensure smooth operation and prevent premature wear of critical components. Be careful not to over-lubricate, as excess grease can attract dirt.
Monitor Starter Performance: Pay attention to how your engine starts. If you notice any unusual sounds, slower cranking, or difficulty starting, these could be signs of issues with the starter motor. Addressing minor problems early can prevent more significant and costly repairs later. Regularly checking the motor’s performance can help you catch wear and tear before it affects the engine’s overall functionality.
Facts
- Cost Savings: Using a starter rebuild kit is significantly cheaper than purchasing a brand-new starter motor.
- Key Components: The kit includes critical parts like brushes, bushings, bearings, seals, and springs to restore the starter’s functionality.
- DIY Friendly: With the right tools and instructions, most people can successfully rebuild their own starter motor using a rebuild kit.
- Enhanced Performance: Rebuilding the starter improves performance, ensuring smoother and more reliable engine starts.
- Sustainability: Rebuilding and reusing the existing starter motor is an environmentally friendly choice, reducing waste and resource consumption.
FAQs
Q: What is the purpose of a starter rebuild kit?
A: A starter rebuild kit is designed to restore a worn-out or malfunctioning starter motor to full working condition by replacing essential components like brushes, bushings, seals, and bearings.
Q: Why should I use a starter rebuild kit instead of buying a new starter motor?
A: A rebuild kit offers a cost-effective solution, extending the life of your existing starter motor at a fraction of the cost of a new one. It also allows for DIY repair, saving on labor costs.
Q: What components are typically included in the 19 HP Kawasaki engine starter rebuild kit?
A: The kit generally includes brushes, bushings, bearings, seals, springs, retainers, and miscellaneous hardware like screws and washers.
Q: How difficult is it to rebuild a starter motor using a kit?
A: Rebuilding a starter motor is relatively straightforward for those with basic mechanical skills. By following a step-by-step guide and using the appropriate tools, most individuals can complete the task themselves.
Q: How do I know when my starter motor needs to be rebuilt?
A: Signs that your starter may need rebuilding include slow cranking, grinding noises, or difficulty starting the engine. Regular inspection and early repairs can prevent more serious issues.
Q: What tools do I need to rebuild the starter motor?
A: Essential tools include screwdrivers, a socket set, wrenches, cleaning supplies (solvent, brushes, rags), lubricant, and safety gear (gloves and safety glasses).
Q: Can regular maintenance help prevent starter motor problems?
A: Yes, performing regular maintenance such as cleaning, lubricating, and inspecting electrical connections can extend the life of your starter motor and prevent costly repairs.
Related: Polyurea Resources
Conclusion
Rebuilding the starter motor of your 19 HP Kawasaki engine using the 21163-7010 16121 starter rebuild kit is a smart and practical option. Not only does it save you money compared to buying a new motor, but it also allows you to take control of maintenance and extend the lifespan of your engine. Equipped with essential components like brushes, bushings, bearings, and seals, this kit ensures that your starter operates smoothly and reliably. Additionally, following a regular maintenance routine will help you avoid significant problems and keep your Kawasaki engine in top condition for years to come.
Stay in the loop for upcoming updates and alerts! Creative Released.